After a long weekend, the master bedroom flooring project is done and we are ‘NLUV‘ with the results! Carpet tiles give you the opportunity to put a ‘soft’ personalized stamp on your space. You’re in the driver’s seat to please your feet! But, with all this talk of DIY, easy to install, no expensive tools or expertise needed, be realistic with the preparation, planning and total project time it will take to finish your vision. We don’t want you disappointed or bewildered by the process. If you create and follow a project plan, you’ll have a great time and a killer space when you’re done.
And remember… No home renovation project is perfect. You may hit a few snags along the way and that’s OK. Just stick to your plan, adjust if needed and when you reach the finish line, you’ll be smiling ear to ear! Here’s how we went from old baby blue plush carpet to a fresh, new custom quilted carpet design!
The Idea
Get samples & visit carpet stores to help you decide
So you’ve decided you want to carpet-tile a room. Regardless if it’s wall-to-wall or a nice big area rug – Congrats! Carpet is cool again with the popularity rise of carpet tiles. I used to really dislike carpet before I met the carpet tile, but I am now a believer. Before you rush online and start picking out patterns and styles, I recommend going to a regular carpet store or even better, an actual carpet tile store. Unfortunately, it will be much easier to find a regular carpet store (unless you are lucky) and honestly, that will do just fine for our purposes. Carpet tiles come in a multitude of textures, heights, materials, colors… you name it and there is probably a carpet tile. To help us with the descriptions and how the tiles would actually look and feel, we went to a local carpet store to learn about carpet.
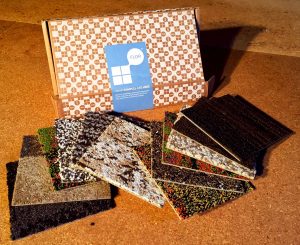
FLOR tiles, instructions and adhesive dots. The full package!
We felt all different types and looked at plush samples vs. industrial ones. We also cruised through the area rug section for ideas on patterns and color combinations. Don’t discount the value of looking and touching actual carpet before you buy your tiles. This can save you time and money on your own project so you can limit the need for excessive amounts of samples and wasting time on carpet types you really don’t want.
There are many carpet tile companies to chose from now. Research your options and pick the one you like best. For us, the most important factors were Made in the USA and recycled content. Our choice was FLOR®. From getting samples to the final order, the process was fast and easy.
Draw it out!
So, you’ve picked out your carpet and are ready to place your order. Hold that thought! Don’t hit the purchase button yet. The measure and planning stage is critical and should not be skipped! The most important thing to consider is that you don’t end up with edges or corners of tiny tiles. If you have a pattern, it won’t be as visually appealing if your design is perfect except for all the odd little ends around the room. If you’re doing a solid carpet, the pattern isn’t your concern but you still don’t want little carpet bits. Small pieces won’t have the same strength as larger tile pieces in staying flat and holding strong together.
Measure, measure, measure

Draw out your grid to scale with all your measurements!
Measure your room! And not just once. Measure it a couple times and ensure you have the right dimensions. Measure everything. Don’t just estimate closets, doors and corners as no big deal to worry about later. This is exactly where those little carpet bits can weasel their way into your grid. Rather than having full tiles against one wall and tiny slivers at the other end, consider shifting the grid so you can have more equal larger tiles at both ends. Regardless if your space is brand new construction or a Victorian castle, those walls that look straight to the naked eye will tell a much different story when you start laying perfectly square carpet tiles down!
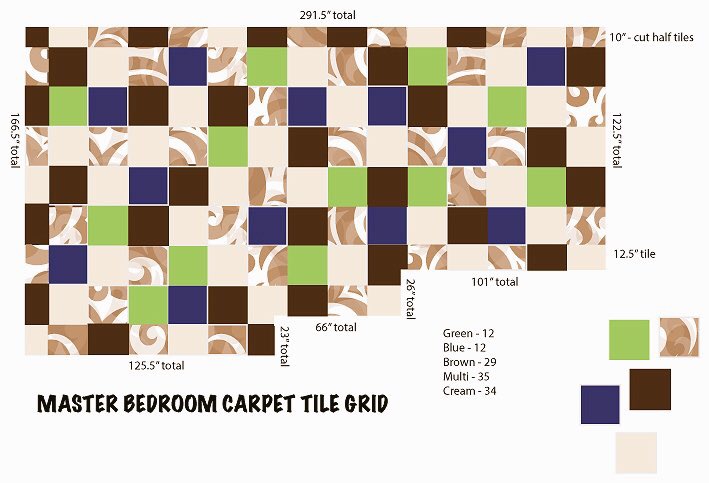
Computer drawn carpet grid with color tiles
If you measure out your room and it looks on paper to be exactly 10 tiles across, don’t believe it. I strongly recommend that you shift your grid so that you have an approximate 1/2 tile at each end. This will save you SO MUCH HEARTACHE – I promise! Since you start at the center and build out when actually installing, this grid shift, anticipating partials on both ends, will compensate for any ‘not perfect’ wall in letting you slightly alter your cuts on the edges by that needed 1/4″ so your borders are stellar and no tiny carpet strips are patch-worked in.
Let out your inner artist
I am a visual person, so my grid wasn’t just about numbers. I wanted a clear drawn representation of the room, with all the tiles laid out including the colors. That way when I placed my order, I knew EXACTLY what to buy (plus 10-15% for mistakes and replacements) and then looked forward to a speedy install with no unanswered placement questions.
Foundation is important
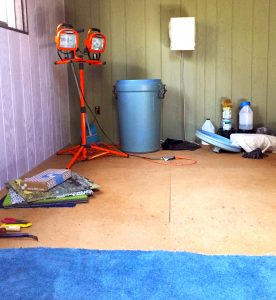
Out with the old and prep for the new!
It’s demo time! Out with the old and prep for the new. If your renovating a bedroom and its the only one you have to sleep in, carefully plan your time so you don’t end a long day without a nice bed to sleep in. If you tear out the old flooring on one day without installing the new carpet, you may be dropping your mattress on the subfloor for the night.
Speaking of subfloor, don’t assume you’ll like what’s under there. Make sure it is solid, level and no water damage before installing your new floor. If you do spot issues with the subfloor, now is the time to address it. New or an additional layer of subfloor may be required to do the job right and you don’t want to cut corners on this step. Also, if you have floor squeaks, this is the perfect time to get rid of them! We had lots of squeaks, but with a series of strategically placed wood screws, we tightened things up and now have quiet steps around the room. Take one last sweep across the room and make sure you didn’t miss any nails, tacks or staples. You want the cleanest, smoothest surface possible for your new investment.
Realistically… Plan for it
Odds are you won’t complete the whole project in one day, unless you have lots of organized and trusted friends. We completed the master bedroom as a team of two across three days. The short schedule:
- Day 1 – Demo and floor prep
- Day 2 – Carpet tile install & staining new baseboards
- Day 3 – Complex carpet tile cuts around doors & closets and baseboard/transition install
Could we have worked 16 hr days and gone faster? Sure, but why? Enjoy the process and your final result. Don’t hate the whole project because your body is so sore and your mind delirious by the end of the day because you did more physical labor in one sitting then you have in a month!
Project Plan
Follow your grid for a faster install
I keep mentioning the project plan you should create to help you. It can be basic and thorough at the same time. Ours wasn’t complicated, but it was thought out and helped keep us on track. Give it a try and build your own. Here’s the outline we used.
- Compare flooring options and decide carpet tiles are the right solution
- Find the right carpet tile style for your needs and pick a flooring company. Order samples and/or visit carpet stores at this point to help in the decision.
- MEASURE the room ACCURATELY accounting for all corners, doors, closets, etc.
- Draw the carpet grid ensuring no small carpet tile pieces will result and shift the grid for larger partial tiles against each edge accommodating ‘non perfect’ straight walls
- Place order of tiles with 10-15% overage for ‘oops’ moments and replacement tiles
- Clear out the room and demo old flooring. Ensure subfloor is acceptable and if not, address it.
- Snap chalk lines across the floor using your carpet grid to give you straight lines to build out from – center to edges
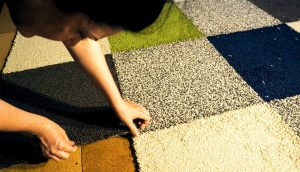
- Install carpet from the center out
- Cut all needed carpet tiles as you go to complete the room
- Install any baseboards and transitions to finish the space (if needed)
- Sit back and ENJOY your success!
Carpet tile installation is more about organization than construction skills. You will need a few tools to complete your space but nothing that will break the bank.
The basic tools
-
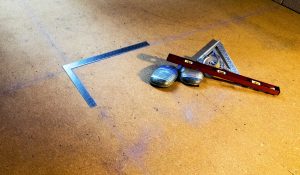
Chalk line snapped and tools ready
Carpet tiles and adhesive tape (Should both come in your order. Make sure you get enough!)
- Measuring tape for building the grid and cutting carpet tiles
- Box cutter to cut tiles
- Paper and a pencil to draw your grid or if you want to get fancy, use a software program
- Chalk line
- Marker to draw cut lines on back of tiles
- Framing square to help with keeping the tiles in perfect alignment
- Hard surface to safely cut your tiles on (I used an old piece of hardboard)
Most of you probably have all these supplies in your garage or tool shed!
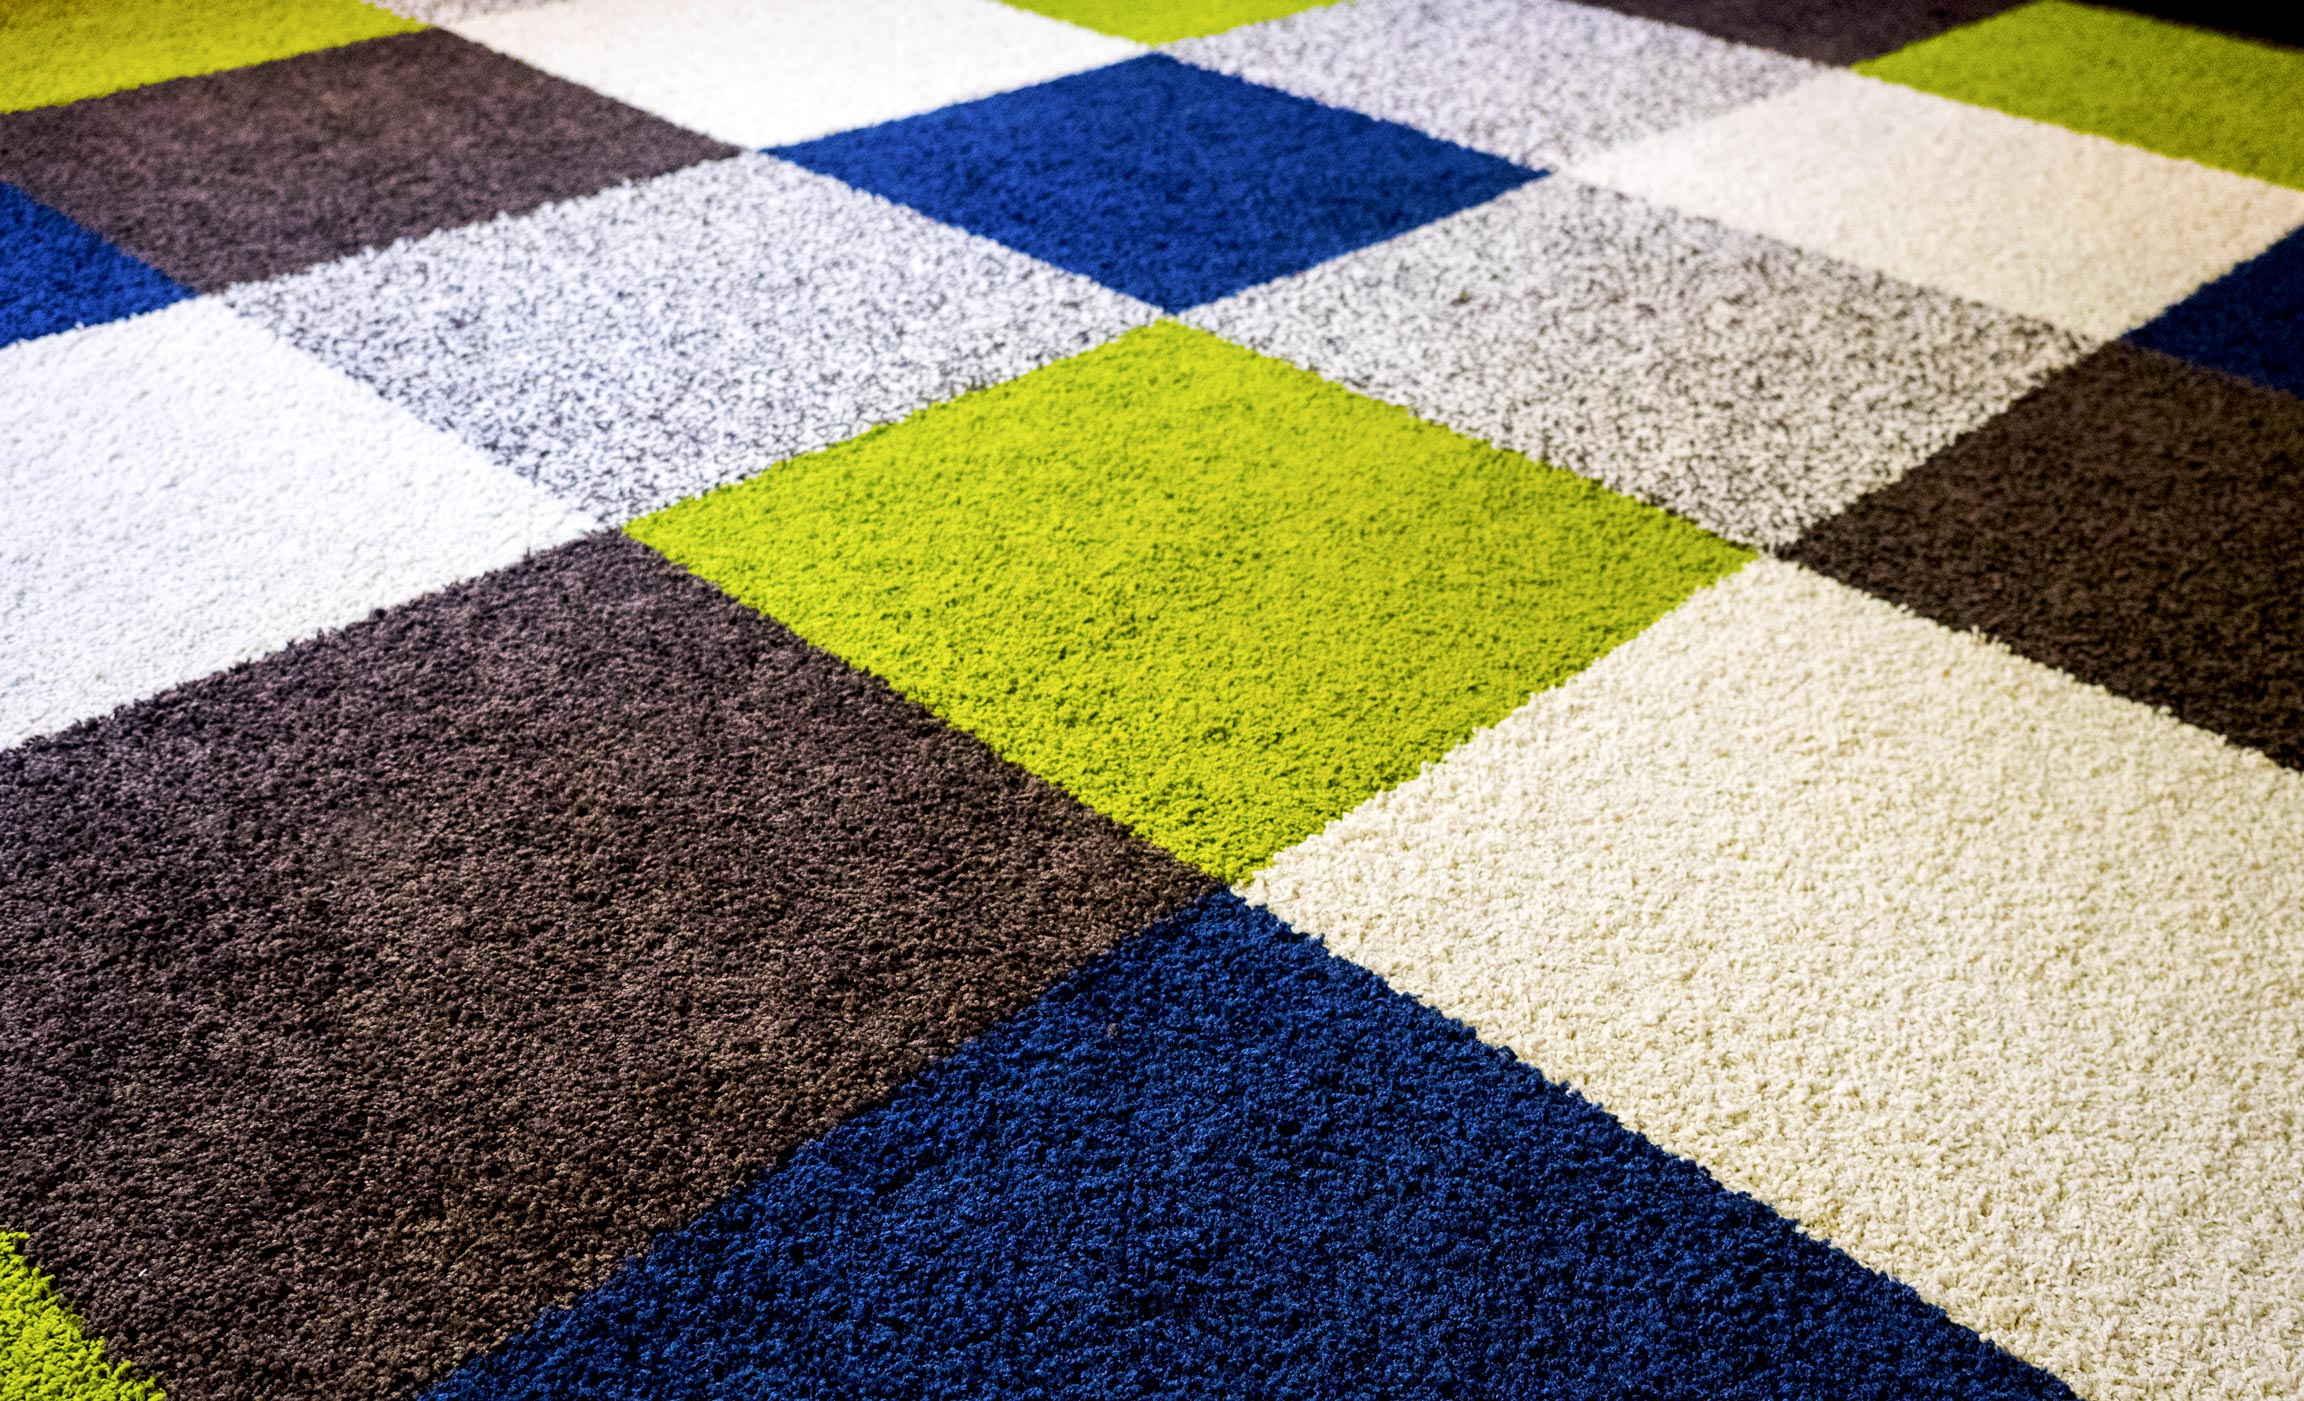
The big reveal
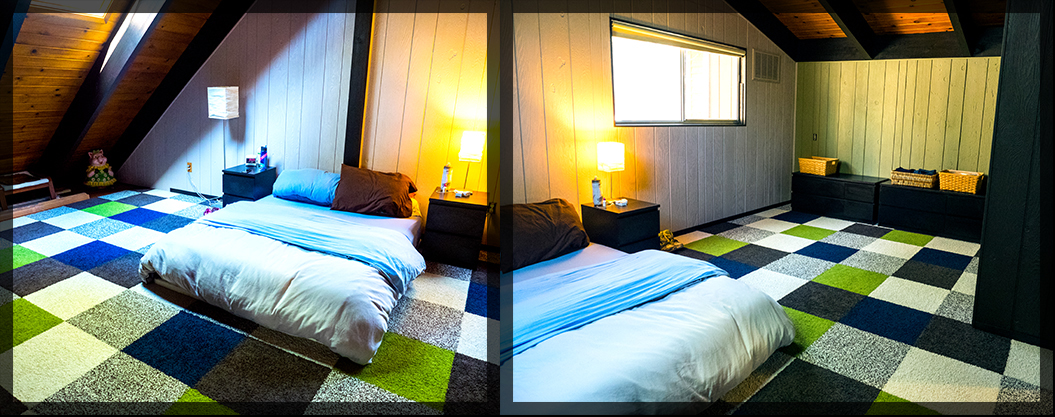
Finished master quilted floor design
When the final piece goes down and you stand back and look around, your sense of accomplishment will flood in. There is only one thing left to do… Get the vacuum out and uncover your design in all its glory! I was excited about my drawing when I created the design and as the tiles went down, things started to take shape. But after we vacuumed for the first time, the room came alive! The tiles melded into the vibrant pattern I had seen in my head for months. Pat yourself on the back. You worked hard! We celebrated with take out from our favorite local restaurant and opened a special bottle of wine, but we didn’t eat it on the new carpet. I didn’t want to practice cleaning or replacing tiles the very first night!
I have a room that is 400 square feet I want to do do black ad grey carpet tiles. How much to purchase? How fast can we receive product?
The tiles I used were from Flor.com. On their website, they have great guidelines for how to properly measure you room and how to calculate the right quantity to buy. I actually bought 20% more than I needed so I could have more full times to cut and only have one side to trim. I also wanted extra in case of future damage or stains and don’t have to worry in case the exact tile is no longer available.